Journal Entry Transactions
Use the Journal Entries screen to record in the Church Windows Accounting Module Transactions where money is transferred between any two accounts.
To access the Journal Entry Transactions screen:
- From The Initial Portal of Church Windows choose Accounting
- Click the Transactions menu in the Button Bar at the top of the screen
- Click the option for Other
- Choose Journal Entry Transactions
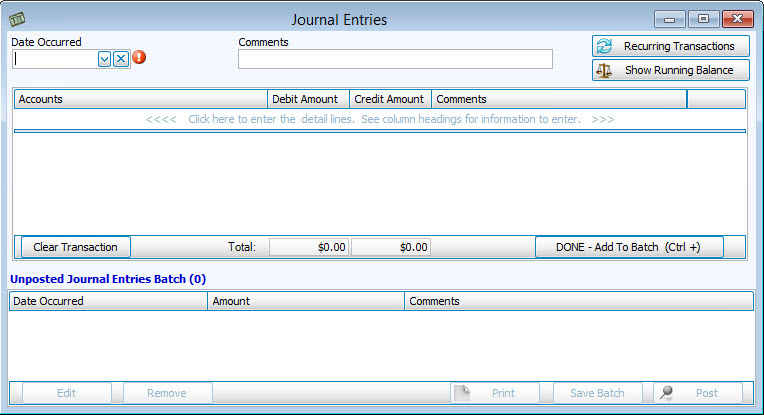
Journal Entries let you transfer money between multiple accounts of multiple types. If you had intended to specifically transfer money between like accounts, you can still choose them from this screen, or you can also use the Transfer screen.
If you have set up Recurring Transactions to reuse in your transaction screens, click the button to open the screen and apply the transaction to your batch. While entering transactions, you can click the Show Running Balances button to do so for the items added to the batch.
- Enter the Date Occurred and any Comments you wish to save with the transaction. Type any Comments you wish to store with the transaction itself. The comments entered here will show up on your Church Windows Accounting reports as Transaction Comments.
- Click the line to begin entering the information for the desired Account, the pertinent Debit Amount or Credit Amount, and the Comments. The comments entered on each detail line will show up on your Church Windows Accounting reports as Line Item Comments.
- When finished with the detail line, click the
 Add button to add the line item. If the transaction you are entering contains additional components that are part of a whole transaction, click the next line and enter the line item. Click the
  delete button to remove the line or
  to undo an action.
 - Each journal entry you make must have a Total of equal Debit Amounts as it does Credit Amounts. Done — Add to Batch (CTRL +).
- Repeat these steps for every transaction until all your batch items have accumulated in the Unposted Journal Entries Batch list. You can make changes to, or remove any batch item. After you first click on the desired item, click either Edit to make changes or Remove to discard it.
- Click the button to Save the batch for use at a later time, and/or Print to print a listing of the items. To finalize the posting of your batch items, click Post. The automatically generated transaction number and the total dollar amount for the batch will display in a message asking you one last time if you wish to print the batch. Answer by clicking Yes or No.
Use the transaction number(s) in the message to look up the posted transaction(s) on the Browse Transactions screen. Each transaction item in the batch will appear as an JRNL transaction.
